
Testing Expo React Native Apps with Jest and React Native Testing Library
Developing a robust and reliable mobile app is a complex task. To ensure that your Expo React Native app performs seamlessly across different devices and scenarios, comprehensive testing is indispensable. In this tutorial, we’ll delve into the world of testing by harnessing the power of Jest and React Native Testing Library.
Why Automation Testing?
Automation testing has become an integral part of modern software development. It offers numerous benefits, including:
- Efficiency: Automated tests can be run quickly and frequently, enabling rapid feedback on changes.
- Consistency: Automated tests eliminate human errors that can occur during manual testing.
- Coverage: Automated tests can cover a wide range of scenarios, including edge cases, that might be overlooked in manual testing.
- Regression Prevention: Automated tests can catch regressions early, preventing the reintroduction of previously fixed bugs.
What is Jest and Why Should You Use It?
Jest is a popular JavaScript testing framework. It’s widely adopted in the React community and offers several compelling features:
- Zero Configuration: Jest requires minimal setup, making it easy to get started with testing.
- Fast and Parallel: Jest runs tests in parallel, ensuring speedy test execution.
- Built-in Matchers: Jest comes with built-in matchers for common assertions, simplifying test writing.
- Snapshot Testing: Snapshot testing enables you to capture component render outputs and track changes over time.
What is React Native Testing Library and Why Might You Use It?
React Native Testing Library is a testing utility that encourages writing tests from the user’s perspective. It focuses on testing how users interact with your components, fostering more robust and meaningful tests. Some benefits include:
- User-Centric Approach: Testing Library promotes testing user interactions, leading to more realistic and effective tests.
- Minimal Implementation Details: It discourages testing implementation details, which results in tests that are less likely to break due to refactoring.
- Accessibility Testing: The library provides utilities to test accessibility features, enhancing the overall quality of your app.
Different Styles of Testing Methodologies
When it comes to testing methodologies, two prominent approaches are Test-Driven Development (TDD) and Behavior-Driven Development (BDD):
- TDD: In TDD, tests are written before the actual code. This ensures that code is developed to meet specific requirements and that any changes to the code are validated against the tests.
- BDD: BDD emphasizes collaboration between developers, testers, and domain experts. Tests are written in a natural language format, focusing on the behavior of the app from the user’s perspective.
TDD is beneficial when you want to ensure that your code meets the specified requirements, while BDD is valuable for maintaining a shared understanding among team members.
Watchman and Jest Visual Studio Code Plugin
Watchman is a tool used by Jest to monitor file changes and trigger test runs, making it an essential tool for Test-Driven Development. Additionally, the Jest Visual Studio Code plugin enhances your testing workflow by providing real-time feedback and an interactive debugging experience.
Organizing Your Test Files
When it comes to organizing your test files for your Expo React Native app, you have the flexibility to place tests either in the same folder as the component being tested ({FileName}.test.js) or in a separate __tests__ folder. Each approach has its own advantages and considerations, depending on your project’s structure and requirements.
Placing Tests in the Same Folder
Pros:
- Proximity: Keeping tests in the same folder as the component makes it easy to find and maintain them. Anyone working with the component can quickly access its tests.
- Clear Relationship: The tests are visually associated with the component, making it clear which tests pertain to which part of your codebase.
- Imports: Import paths for your component and its tests are straightforward, as they share the same directory structure.
Cons:
- Clutter: As your app grows and you add more components, the same-directory approach might lead to a cluttered directory, making it harder to navigate.
Using a __tests__ Folder
Pros:
- Cleaner Directory Structure: Placing tests in a dedicated
__tests__folder helps maintain a cleaner directory structure, especially as your app grows with more components. - Isolation: Test files are isolated from the source code, which can help reduce unintentional coupling between test and production code.
- Granular Import Paths: Import paths for tests are more granular, making it clear that you’re importing tests rather than production code.
Cons:
- Indirection: Having test files in a separate folder might introduce a slight indirection when locating tests, especially for newcomers to your project.
- Maintenance: Maintaining two separate folders (one for production code and another for tests) might lead to challenges in keeping them in sync.
When to Choose Each Approach
Same-Folder Approach: This approach works well for smaller projects or components where maintaining a direct association between components and their tests is beneficial. If your components are simple and you want quick access to related tests, this might be your preferred choice.
__tests__ Folder Approach: For larger projects with numerous components and a need for a cleaner directory structure, the __tests__ folder approach shines. This separation enhances clarity and helps manage complexity. Additionally, if you want to minimize the risk of accidentally coupling test code with production code, this is a great choice.
Ultimately, the choice depends on your team’s preferences, the size of your project, and how you prioritize maintainability and readability. Whether you choose to keep tests in the same folder or use a dedicated __tests__ folder, remember that the goal is to have a reliable, consistent and organized testing strategy that enhances your development process.
Practical Example: Testing Basics and a Snapshot
Let’s dive into a practical example by testing the simplest component: App.js. This component serves as the entry point for your app. Our goal here is to showcase how to write tests using Jest and React Native Testing Library.
App.js: A Quick Overview
import { StatusBar } from "expo-status-bar";
import { StyleSheet, Text, View } from "react-native";

export default function App() {
  return (
    <View style={styles.container}>
      <Text>Open up App.js to start working on your app!</Text>
      <StatusBar style="auto" />
    </View>
  );
}

const styles = StyleSheet.create({
  container: {
    flex: 1,
    backgroundColor: "#fff",
    alignItems: "center",
    justifyContent: "center",
  },
});
The App component is straightforward. It renders a simple view containing a text message and a status bar.
Writing Tests for App.js
import renderer from "react-test-renderer";
import App from "./App";

describe("App", () => {
  it("has 1 child", () => {
    const tree = renderer.create(<App />).toJSON();
    expect(tree.children.length).toBe(1);
  });

  it("renders correctly", () => {
    const tree = renderer.create(<App />).toJSON();
    expect(tree).toMatchSnapshot();
  });
});
In this test file, we’re using Jest and React Native Testing Library to write tests for App.js.
- The First Test (
it("has 1 child")): This test checks whether the rendered component has a single child element. We use therenderer.create()method to create a virtual tree of the rendered component and then assert that the length of its children array is equal to 1. - The Second Test (
it("renders correctly")): This test utilizes Jest’s snapshot testing feature. It renders the component and captures a snapshot of its rendered output. This snapshot is saved and can be compared with subsequent runs to detect any unintended changes in the component’s rendering.
By running these tests, you can ensure that your App component remains consistent in its structure and rendering over time. This becomes especially valuable when you make changes to the component and want to verify that those changes don’t introduce unexpected issues.
Practical Example: Testing Press Event
Let’s take a closer look at another practical example involving the MyButton component. This component encapsulates a button element and triggers a callback function when clicked. Our objective here is to demonstrate how to implement tests using Jest and React Native Testing Library.
MyButton.js: A Brief Overview
import { Button } from "react-native";

export default MyButton = (props) => {
  return (
    <Button
      testID="MyButton:Button:ClickMe"
      title="Click Me"
      onPress={props.onPress}
    />
  );
};
The MyButton component is quite simple. It takes a prop named onPress, which represents the callback function to be executed when the button is pressed.
Writing Tests for MyButton.js
import MyButton from "./MyButton";
import { render, fireEvent } from "@testing-library/react-native";

describe("MyButton", () => {
  it("calls onPress function when the button is pressed", () => {
    const mockOnPress = jest.fn();

    const { getByTestId } = render(<MyButton onPress={mockOnPress} />);
    const pressMeButton = getByTestId("MyButton:Button:ClickMe");
    fireEvent.press(pressMeButton);

    expect(mockOnPress).toHaveBeenCalled();
  });
});
In this test file, we’re delving into the testing details of the MyButton component using Jest and React Native Testing Library.
- Test Scenario (
it("calls onPress function when the button is pressed")): This test simulates a button press event and checks whether the providedonPressfunction gets called. To do this, we create a mock function usingjest.fn(), which allows us to track whether the function is called. - Rendering and Interaction (
render(<MyButton onPress={mockOnPress} />)): We use therenderfunction from React Native Testing Library to render theMyButtoncomponent. We pass the mockonPressfunction as a prop. This function is what we want to verify is called when the button is pressed. - Getting the Button (
const pressMeButton = getByTestId("MyButton:Button:ClickMe")): We locate the button using thegetByTestIdfunction from React Native Testing Library. We’re using thetestIDattribute we defined in theMyButtoncomponent to uniquely identify the button. - Simulating Button Press (
fireEvent.press(pressMeButton)): ThefireEvent.pressfunction simulates a press event on the button element we obtained earlier. This triggers the callback function we provided as theonPressprop. - Asserting Callback Invocation (
expect(mockOnPress).toHaveBeenCalled()): Finally, we use theexpectfunction to assert that our mockonPressfunction has been called during the button press event.
By conducting this test, you ensure that the MyButton component correctly triggers the callback function upon a button press, confirming that the component behaves as expected.
Practical Example: Testing Edge Cases
In this practical example, we’ll explore testing the MyGreeting component using Jest and React Native Testing Library. The MyGreeting component takes language and name props and displays a corresponding greeting message. This example will provide a deeper understanding of how to approach testing complex components.
MyGreeting.js: A Closer Look
import { Text } from "react-native";

export default MyGreeting = (props) => {
  const greeting = () => {
    if (props.ln === "fr") {
      return "Bonjour";
    } else if (props.ln === "es") {
      return "Hola";
    } else {
      return "Hello";
    }
  };

  return (
    <Text>
      {greeting()} {props.name}
    </Text>
  );
};
The MyGreeting component displays a greeting message based on the provided language (ln) and name props.
Writing Tests for MyGreeting.js
import { render } from "@testing-library/react-native";
import MyGreeting from "./MyGreeting";

describe("MyGreeting", () => {
  it("displays Bonjour in French", () => {
    const { getByText } = render(<MyGreeting ln="fr" name="Alice" />);
    expect(getByText("Bonjour Alice")).toBeTruthy();
  });

  it("displays Hola in Spanish", () => {
    const { getByText } = render(<MyGreeting ln="es" name="Bob" />);
    expect(getByText("Hola Bob")).toBeTruthy();
  });

  it("displays Hello in default language", () => {
    const { getByText } = render(<MyGreeting ln="en" name="Charlie" />);
    expect(getByText("Hello Charlie")).toBeTruthy();
  });
});
This test file delves into the intricacies of testing the MyGreeting component using React Native Testing Library.
- Test Scenarios: Different Language Greetings (
itstatements): We’ve defined three test scenarios to cover different language cases. For each test, we render theMyGreetingcomponent with appropriatelnandnameprops and then assert the expected greeting message usinggetByText. - Rendering and Matching Greetings (
const { getByText } = render(...)): Therenderfunction from React Native Testing Library is employed to render theMyGreetingcomponent with specific props. We use destructuring to extract thegetByTextfunction, which we’ll use to locate the rendered greeting message. - Verifying Greeting Text (
expect(getByText(...)).toBeTruthy()): We use thegetByTextfunction to find the rendered greeting message in the component’s output. Then, we use Jest’sexpectfunction to verify that the expected greeting text is present.
By creating these tests, you ensure that the MyGreeting component correctly displays greetings based on the provided props. Additionally, you cover edge cases, such as the default language scenario, to ensure that your component handles various situations accurately.
Testing components like MyGreeting goes beyond basic interactions and showcases how to handle more intricate scenarios. Utilizing React Native Testing Library in conjunction with Jest empowers you to assess different combinations of inputs and verify that your component outputs the expected results. Armed with this knowledge, you’re better equipped to create comprehensive tests that cover both typical and exceptional use cases.
Practical Example: Testing API Calls
Our journey through testing wouldn’t be complete without delving into a more complex example. In this section, we’ll explore testing the CatFact component using Jest and React Native Testing Library. The CatFact component fetches data from an API and displays cat facts based on the retrieved data. This example will give us a deeper understanding of handling asynchronous operations in tests.
CatFact.js: A Deeper Dive
import { useState, useEffect } from "react";
import { Text } from "react-native";

export default CatFact = () => {
  const [catFactData, setCatFactData] = useState(undefined);

  useEffect(() => {
    fetch("https://cat-fact.herokuapp.com/facts")
      .then((response) => response.json())
      .then((data) => {
        setCatFactData(data);
      });
  }, []);

  if (catFactData === undefined) {
    return <Text>Loading...</Text>;
  }

  return catFactData.length > 0 ? (
    <Text>{catFactData[0].text}</Text>
  ) : (
    <Text>No Cat Facts!</Text>
  );
};
The CatFact component employs useState and useEffect hooks to fetch cat facts from an API and display them.
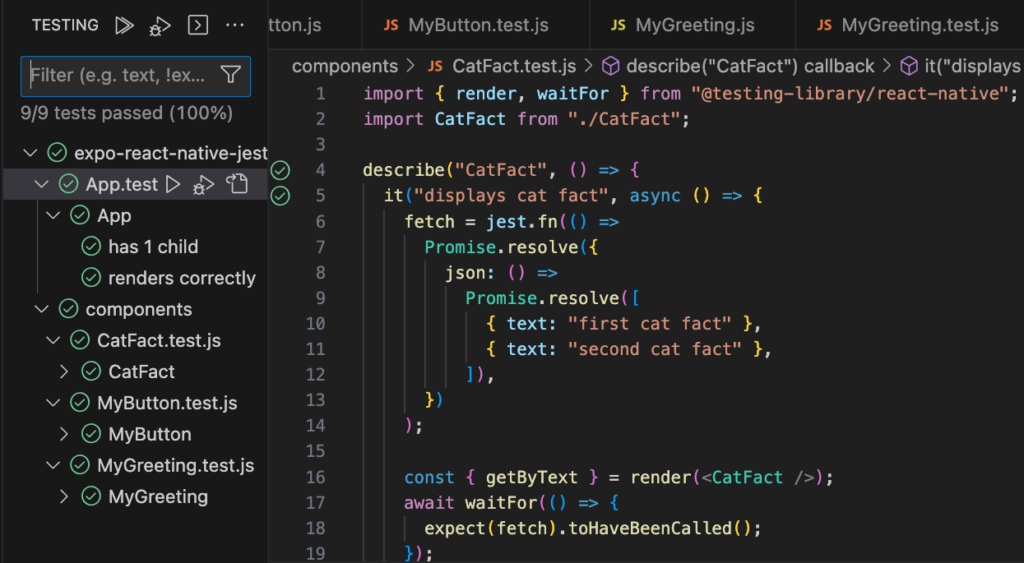
Writing Tests for CatFact.js
import { render, waitFor } from "@testing-library/react-native";
import CatFact from "./CatFact";

describe("CatFact", () => {
  it("displays cat fact", async () => {
    fetch = jest.fn(() =>
      Promise.resolve({
        json: () =>
          Promise.resolve([
            { text: "first cat fact" },
            { text: "second cat fact" },
          ]),
      })
    );

    const { getByText } = render(<CatFact />);
    await waitFor(() => {
      expect(fetch).toHaveBeenCalled();
    });

    const catFactElement = getByText("first cat fact");
    expect(catFactElement).toBeTruthy();
  });

  it("displays no cat fact", async () => {
    fetch = jest.fn(() =>
      Promise.resolve({
        json: () => Promise.resolve([]),
      })
    );

    const { getByText } = render(<CatFact />);
    await waitFor(() => {
      expect(fetch).toHaveBeenCalled();
    });

    const catFactElement = getByText("No Cat Facts!");
    expect(catFactElement).toBeTruthy();
  });

  it("displays no cat fact due to loading", async () => {
    fetch = jest.fn(() =>
      Promise.resolve({
        json: () => Promise.resolve([]),
      })
    );

    const { getByText } = render(<CatFact />);

    const catFactElement = getByText("Loading...");
    expect(catFactElement).toBeTruthy();
  });
});
This test file dives into the complexity of testing the asynchronous behavior of the CatFact component using React Native Testing Library.
- Test Scenarios (
itStatements): We’ve defined three test scenarios. The first tests if a cat fact is displayed when fetched data is available. The second checks whether the component displays a message when there are no cat facts. The third verifies that the “Loading…” message is displayed while data is being fetched. - Mocking Fetch (
fetch = jest.fn()...): We mock thefetchfunction usingjest.fn()to control the behavior of API calls. We simulate different responses by resolving promises with mock data. - Rendering and Waiting (
const { getByText } = render(<CatFact />); await waitFor(() => {...}): We render theCatFactcomponent and use thewaitForfunction to wait for asynchronous operations to complete. This is crucial to ensure that we wait for the API call to finish before making assertions. - Expecting Fetch Calls (
await waitFor(() => { expect(fetch).toHaveBeenCalled(); });): Within thewaitForfunction, we useexpectto verify that the mockedfetchfunction has been called. This ensures that the API call has been triggered as expected. - Verifying Displayed Text (
const catFactElement = getByText(...); expect(catFactElement).toBeTruthy();): We use thegetByTextfunction from React Native Testing Library to locate the rendered text in the component’s output. Then, we useexpectto confirm that the expected text is present.
By conducting these tests, you demonstrate a deep understanding of how to handle asynchronous operations, mocking API calls, and verifying the rendered output of components that involve complex logic.
Testing components like CatFact goes beyond simple interactions and showcases your ability to handle complex scenarios. By dealing with asynchronous operations and mocking external dependencies, you’re better equipped to validate components that involve real-world data fetching. Armed with this knowledge, you can confidently write tests that cover a wide range of use cases and ensure the reliability of your app’s behavior.
Handling Edge Cases and Boundary Testing
Above I have shown some very basics examples you could use to get started testing your react native app. When it comes to testing an Expo React Native app, thorough testing goes beyond verifying basic functionality. It’s essential to consider edge cases and boundary values to ensure your app remains robust in various scenarios. Edge cases are inputs or conditions that are at the extremes of what your app can handle, while boundary values are the points just before and after a limit.
Identifying Edge Cases
Start by identifying potential edge cases in your app. These could include scenarios where:
- User input is empty or contains special characters.
- Numeric values are at the lowest or highest limits.
- Arrays or lists are empty or contain only one item.
Writing Tests for Edge Cases
Consider a scenario where your app handles user authentication. To test edge cases, create tests that:
- Validate the behavior when the username and password are empty strings.
- Verify the response when an incorrect password is entered multiple times.
- Check how the app behaves when an unusually long username is used.
Testing Boundary Values
Boundary testing focuses on inputs that are just below, at, or just above specific limits. For instance, if your app accepts age input, test cases could include:
- Entering an age just below the minimum allowed.
- Entering an age exactly at the minimum allowed.
- Entering an age just above the maximum allowed.
Benefits of Edge and Boundary Testing
- Improved Robustness: Edge and boundary testing uncovers potential vulnerabilities in your app’s logic and handling of extreme inputs.
- Enhanced User Experience: By handling edge cases gracefully, you ensure that your app doesn’t break or display confusing errors in unusual situations.
- Regulatory Compliance: Certain industries require applications to handle edge cases accurately to meet regulatory standards.
Remember that while edge and boundary testing is important, it’s not meant to replace comprehensive testing. It’s an additional layer of testing that complements your existing suite.
Prefer a Video Tutorial?
I talk through this tutorial over on my MissCoding YouTube channel, if you prefer content in video format then head on over there for more content.
Summary
Testing Expo React Native apps with Jest and React Native Testing Library empowers you to create reliable, user-friendly applications. We explored the significance of automation testing and why tools like Jest and React Native Testing Library are invaluable for building robust apps. We also delved into different testing methodologies and practical examples, ranging from basic component rendering to handling asynchronous operations.
By understanding how to structure tests, simulate user interactions, and validate complex behaviors, you’re equipped to create a comprehensive testing strategy. Incorporating edge and boundary testing ensures that your app can handle a wide range of scenarios effectively. Whether you’re a seasoned developer or new to mobile app testing, this guide has provided you with the knowledge and tools to elevate your app’s quality and user experience.
If you’ve enjoyed this article, you may also enjoy my other tech and react native blogs or videos on YouTube. All my code is available on GitHub (chelseafarley), follow me to be the first to see my latest code used in my blogs and YouTube videos.


This is really cool, thanks!