Introduction
In the ever-evolving world of iOS app development, ensuring the quality and reliability of your app is paramount. Manual testing can be time-consuming and error-prone, which is where automation testing comes to the rescue. In this article, we’ll explore how XCTest, Apple’s built-in testing framework, can be your go-to tool for conducting unit testing, performance testing, and UI testing in iOS apps.
Benefits of XCTest
1. Unit Testing
- XCTest provides a robust framework for writing and executing unit tests in Swift or Objective-C.
- It helps ensure that individual components of your app, such as classes and functions, work as expected.
- XCTest’s integration with Xcode makes it easy to run and debug unit tests, promoting early bug detection and code quality.
2. Performance Testing
- XCTest allows you to measure and track the performance of specific code segments, ensuring your app runs smoothly.
- We’ll explore how to set performance metrics, run tests, and identify performance bottlenecks.
3. UI Testing
- UI testing with XCTest enables automated interaction with your app’s user interface, simulating user actions.
- Learn how to create UI test cases, interact with elements, and verify UI elements’ state and behavior.
- XCTest’s UI recording feature can accelerate test case creation. This is a little record button down the bottom of your Xcode window, see the red circle in the image below:

To use XCTest UI Recording, place your cursor inside your test function and open your app. It will record your UI interactions inside the function and you will just need to go back and add assertions.
Best Practices for XCTest
- Clear Test Naming: Choose descriptive and concise names for your test methods. Clear test names make it easier to identify issues when tests fail.
- Test Isolation: Ensure that each test case is isolated and independent of others. Avoid sharing state between test cases to maintain reliability.
- Arrange-Act-Assert (AAA) Pattern: Follow the AAA pattern in your test methods. Clearly separate the arrangement, execution (action), and assertion phases to improve test readability.
- Use Mocking and Stubbing: When testing components that interact with external dependencies (e.g., network calls), use mocking or stubbing frameworks to control external interactions and simulate different scenarios.
- Continuous Integration: Integrate XCTest tests into your CI/CD pipeline to catch regressions early in the development process.
- Regular Maintenance: Update your tests to match changes in the app’s codebase. Failing to update tests can lead to false positives or negatives.
- Performance Baselines: Establish performance baselines for your app’s critical functions. Regularly test against these baselines to catch performance regressions.
Troubleshooting XCTest Failures
There are some common causes for failures within your tests, these are some things to investigate if there are failing test cases:
- Test Failures: When a test fails, first examine the failure message and location provided by XCTest. This information can pinpoint the issue.
- Flakiness: If tests are intermittent or flaky, investigate potential timing issues. Adjust timeouts, waiting strategies, or synchronization mechanisms as needed.
- Test Dependencies: Avoid excessive test dependencies. Tests relying heavily on the state of other tests can lead to cascading failures.
- Performance Bottlenecks: When dealing with performance test failures, profile your code to identify bottlenecks. XCTest’s performance testing tools can help with this.
- Memory Leaks: XCTest can be used to identify memory leaks. If your tests show increasing memory usage, inspect the corresponding code for potential issues with object ownership.
- Asynchronous Testing: Be cautious when dealing with asynchronous code. Ensure that XCTest expectations are correctly fulfilled to prevent test timeouts or false positives/negatives.
- Xcode Version Compatibility: Sometimes XCTest behavior may vary with different Xcode versions. Ensure that your tests work consistently with the Xcode version you’re using.
- Third-Party Dependencies: If XCTest interacts with third-party libraries or dependencies, ensure they are correctly configured and updated. Compatibility issues can lead to test failures.
- Logging and Debugging: Utilize XCTest’s debugging features, such as breakpoints and logging, to inspect the state of your app during test execution. This can be invaluable for diagnosing issues.
- Community Resources: Don’t hesitate to seek help from the developer community. Online forums, documentation, and Q&A websites can be valuable resources for troubleshooting XCTest-specific issues.
By following these best practices and addressing common troubleshooting scenarios, you’ll be well-prepared to create robust XCTest test suites for your iOS app and maintain them effectively. XCTest’s versatility and integration with Xcode make it a powerful tool for ensuring the quality and reliability of your iOS applications.
How to Run Tests in Xcode
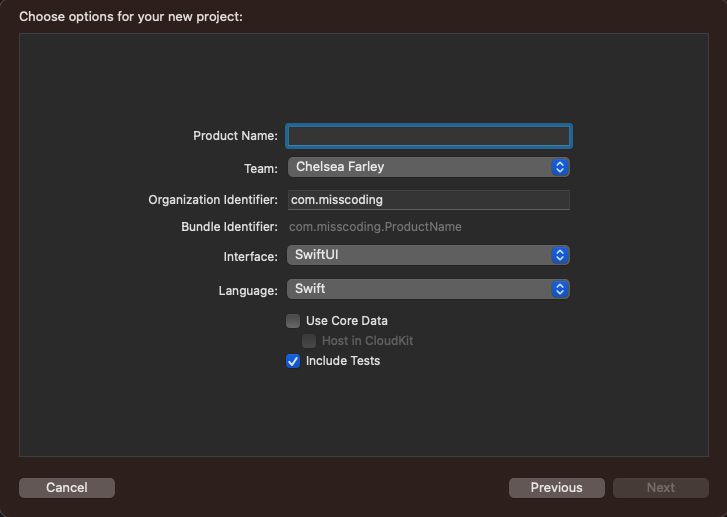
Firstly, when setting up your project you will want to ensure you tick the checkbox to include tests. It is best to test from the beginning and embed testing in your SDLC to ensure your app meets coded requirements and allow you to iterate quickly without a lot of fear of regression. You can add tests in after but you’ll likely have less coverage and also it is less straightforward than simply ticking a box (not too complex though).
Once you have your tests setup. Inside Xcode there are a number of ways to run tests…
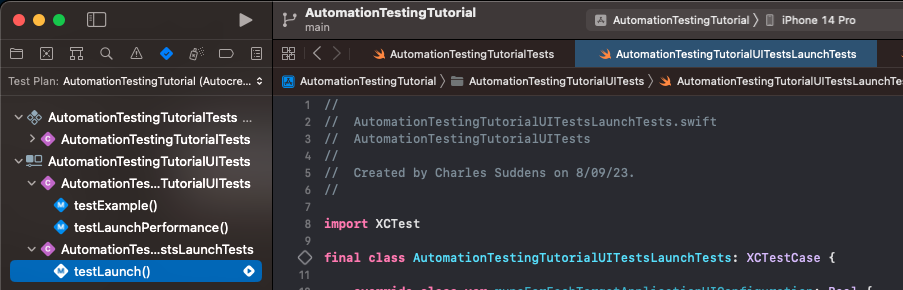
You can run them test by test using the button next to the test, or file by file using the button next to the class, e.g.:
Alternatively, you can open the test runner using the ⌘ + 6 shortcut. This also allows you to create and edit test plans. Alternatively, this can be accessed via the UI as below:
A Practical Example: Unit Testing with XCTest
Unit testing allows you to test the logic of your app. Where there are dependencies you may choose to mock and stub these out and if you follow the principle of dependency inversion this can help improve the ease of the testing process.
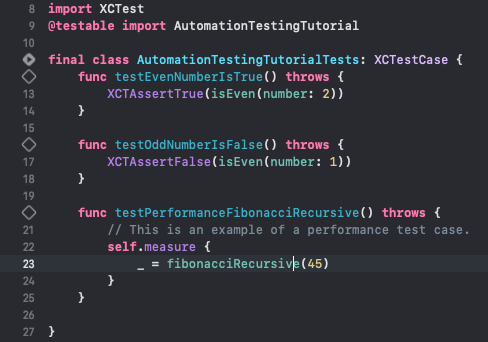
In this example, I test that my simple function IsEven returns true for even numbers and false for odd numbers. I also performance test a recursive implementation of Fibonacci. However, I will go into more detail on performance tests in a later section as they differ in how they work. You can see my code for the IsEven function below:
func isEven(number: Int) -> Bool {
    return number % 2 == 0
}
And the corresponding tests below, which focus on testing different scenarios the IsEven algorithm should cater for:
import XCTest
@testable import AutomationTestingTutorial

final class AutomationTestingTutorialTests: XCTestCase {
    func testEvenNumberIsTrue() throws {
        XCTAssertTrue(isEven(number: 2))
    }

    func testOddNumberIsFalse() throws {
        XCTAssertFalse(isEven(number: 1))
    }

    func testPerformanceFibonacciRecursive() throws {
        // This is an example of a performance test case.
        self.measure {
            _ = fibonacciRecursive(45)
        }
    }
}
Firstly we import XCTest. This part of the code imports XCTest, which is the testing framework provided by Apple for writing and running tests in Xcode.
We then follow this import with @testable import AutomationTestingTutorial on line 2, this imports the module or target you want to test. It’s used when you want to test internal (non-public) methods and properties of your app.
Next we define a test class named AutomationTestingTutorialTests. This class inherits from XCTestCase, which is the base class for XCTest test cases in Swift.
Finally we define 2 test methods. The first is a test method named testEvenNumberIsTrue. In XCTest, test methods should start with the word “test.” This method tests whether the isEven function returns true when given an even number, in this case, 2. XCTAssertTrue is an XCTest assertion that checks if the given expression evaluates to true. If it does, the test passes; otherwise, it fails.
Similar to the previous method, our second test is named testOddNumberIsFalse and checks whether the isEven function returns false when given an odd number, in this case, 1. XCTAssertFalse is another XCTest assertion that checks if the given expression evaluates to false.
With these tests we aim to test the function under various conditions using inputs that result in the full range of outputs. In a lot of cases it can be useful to consider boundary or edge cases but this doesn’t seem necessary for our test. I have not provided any examples of mocking or stubbing but they can be useful when making network calls for example.
After running the tests, the result should be reflected alongside the test functions and also in test explorer in the sidebar.
A Practical Example: UI Testing with XCTest
In the world of iOS app development, testing your user interface (UI) is as critical as testing your app’s functionality. UI testing ensures that your app not only works as expected but also provides a smooth and visually appealing experience to users. XCTest, Apple’s testing framework, offers a robust solution for automating UI tests, allowing you to verify that your app’s UI elements and interactions behave correctly.
The UI Under Test
We will consider a simple UI with a static text that holds a counter that is incremented on button tap. The code for the UI is as follows:
import SwiftUI

struct ContentView: View {
    @State var counter = 0
    var body: some View {
        VStack {
            Text("\(counter)")

            Button("Increase Counter") {
                counter += 1
            }
                .font(.title)
        }
        .padding()
    }
}

struct ContentView_Previews: PreviewProvider {
    static var previews: some View {
        ContentView()
    }
}
Understanding the XCTest UI Testing Setup
To illustrate practical UI testing with XCTest, let’s take a look at two Swift files: AutomationTestingTutorialUITests.swift and AutomationTestingTutorialUITestsLaunchTests.swift. These files contain UI tests that validate the behavior of an example app. Let’s break down what each file does.
AutomationTestingTutorialUITests.swift
This test, tests launching the application and interacting with UI views and asserting the result. In this case we are testing the counter label is incremented on button press. The code for this file is as follows:
import XCTest

final class AutomationTestingTutorialUITests: XCTestCase {

    override func setUpWithError() throws {
        continueAfterFailure = false
    }

    func testExample() throws {
        // UI tests must launch the application that they test.
        let app = XCUIApplication()
        app.launch()

        let counterText = app.staticTexts.firstMatch

        XCTAssertEqual(counterText.label, "0")

        let increaseButton = app.buttons["Increase Counter"]
        increaseButton.tap()

        XCTAssertEqual(counterText.label, "1")
    }

    func testLaunchPerformance() throws {
        if #available(macOS 10.15, iOS 13.0, tvOS 13.0, watchOS 7.0, *) {
            // This measures how long it takes to launch your application.
            measure(metrics: [XCTApplicationLaunchMetric()]) {
                XCUIApplication().launch()
            }
        }
    }
}- Test Setup:
- In the
setUpWithErrormethod, the test environment is configured. This method is called before each test method in the class. It’s essential to prepare the environment for testing, such as setting initial states and preferences.
- In the
- Test Example:
- The
testExamplemethod is an example UI test case. It does the following:- Launches the application under test using
XCUIApplication(). - Retrieves a UI element representing a static text, which displays a counter value.
- Asserts that the initial counter value is “0” using
XCTAssertEqual. - Taps a button labeled “Increase Counter.”
- Asserts that the counter value has incremented to “1.”
- Launches the application under test using
- The
AutomationTestingTutorialUITestsLaunchTests.swift
This test, launches the app and takes a screenshot. This can be useful for diagnosing problems when there are test failures in the future as you can inspect the state of the app at the time of the test failure. You would likely want an assertion somewhere in here if using this test in the real world. The code for this file is as follows:
import XCTest

final class AutomationTestingTutorialUITestsLaunchTests: XCTestCase {

    override class var runsForEachTargetApplicationUIConfiguration: Bool {
        true
    }

    override func setUpWithError() throws {
        continueAfterFailure = false
    }

    func testLaunch() throws {
        let app = XCUIApplication()
        app.launch()

        // Insert steps here to perform after app launch but before taking a screenshot,
        // such as logging into a test account or navigating somewhere in the app

        let attachment = XCTAttachment(screenshot: app.screenshot())
        attachment.name = "Launch Screen"
        attachment.lifetime = .keepAlways
        add(attachment)
    }
}
And the following goes into some of the detail, of what is happening inside this test case:
- Test Setup:
- This class inherits from
XCTestCaseand provides a method namedtestLaunch. - The
setUpWithErrormethod configures the test environment. In this case, it ensures that the test doesn’t continue after any failure (continueAfterFailure = false).
- This class inherits from
- Test Launch:
- The
testLaunchmethod does the following:- Launches the application under test using
XCUIApplication(). - Allows you to insert additional steps to perform after the app’s launch, such as logging into a test account or navigating to a specific screen.
- Captures a screenshot of the app’s launch screen using
XCTAttachment. This is a helpful practice for visually documenting the app’s state during testing. If the test fails you can use it to look back and review what state the application was in when the test executed which can be useful for identifying issues.
- Launches the application under test using
- The
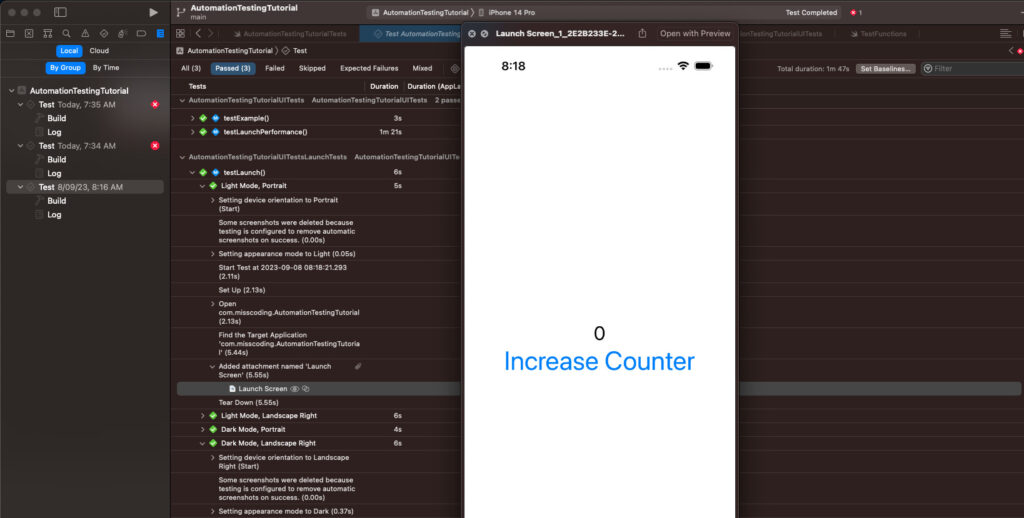
The above screenshot shows you where to find a test screenshot in Xcode. You’ll want to select the relevant Test activity from the sidebar, then find the test that took the screenshot. After that you can find the step where the screenshot is attached, and click the eye to open the screenshot and inspect.
Key Takeaways
- XCTest UI testing enables you to automate the validation of your app’s user interface, ensuring that it functions as expected and looks right.
- Test setup methods, like
setUpWithError, are crucial for configuring the test environment and establishing initial conditions. - Test methods, such as
testExample, simulate user interactions and make assertions to verify the app’s behavior. - Capturing screenshots during testing helps you visually document the app’s state for further analysis and debugging.
Incorporating XCTest UI testing into your iOS app development workflow empowers you to maintain a high level of UI quality and user satisfaction. These tests not only catch regressions but also ensure that your app’s interface remains polished and reliable across updates.
A Practical Example: Performance Testing with XCTest
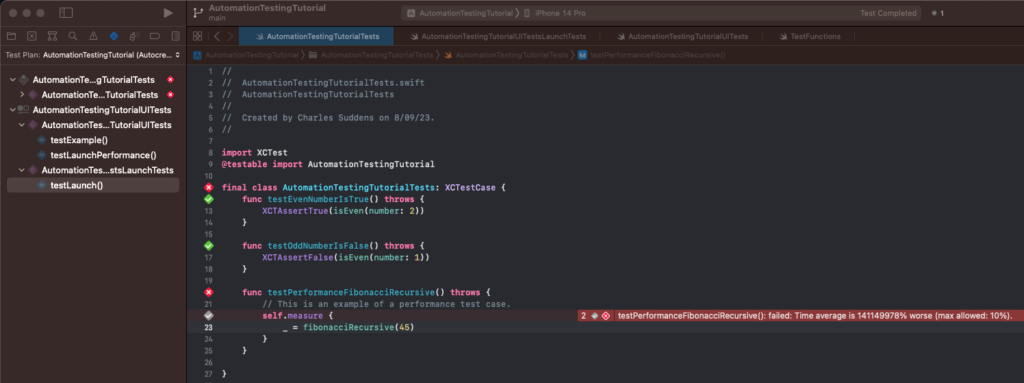
Finally, let’s look at performance testing. We have added two performance tests to our application, one as a unit test and one as a UI test, these focus on the time to execute a particular action. Once these have run we look to set a baseline, we can update this baseline on subsequent runs or leave it as is. It is worth noting that if the performance tests notices an increase in the measured time that exceeds 10% of the baseline, the test will fail. With this in mind the user will be alerted to a performance regression in an area of their app and be able to take diagnostic steps. Performance in apps is a key area for focus as they often have limited compute and often users have short attention spans and frequently switch between apps.
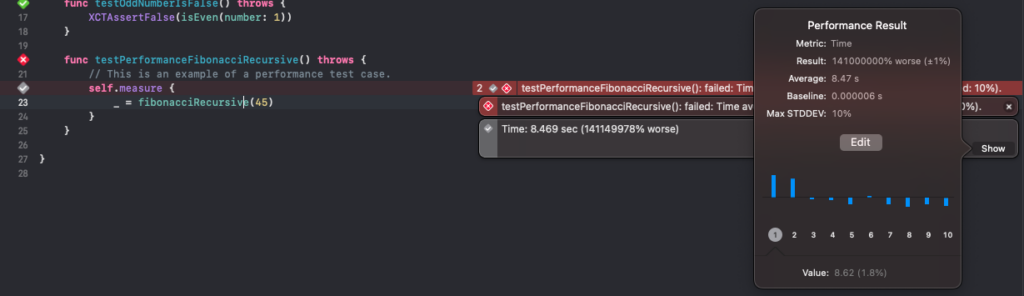
You can choose to edit the baseline or accept the new result if it was a valid change that is within your acceptable limits. Or you may choose to investigate further and look to resolve the performance issue.

It’s worth noting, if you’re expecting your test to fail and it is not failing even though a baseline is set and the test is outside the acceptable range, just try restarting Xcode. I had this happen and restarting Xcode caused the test to start failing.
Performance Testing a Function
The first test is a unit test on the recursive Fibonacci algorithm. It’s worth noting that this is actually just a good way to simulate a performance regression by changing the parameter input to the Fibonacci function. This is because Fibonacci is of exponential time complexity so changing the input even slightly can see greatly different performance. In a real world example, I would not change the inputs but it is useful for playing with how the performance unit tests work. In reality, your test code would not change that you are performance testing and you would just have the test sitting there in case the algorithm changed and caused performance issues.
This is the Fibonacci method my tests covered:
func fibonacciRecursive(_ n: Int) -> Int {
    if n <= 0 {
        return 0
    } else if n == 1 {
        return 1
    } else {
        return fibonacciRecursive(n - 1) + fibonacciRecursive(n - 2)
    }
}
And it has the corresponding test case:
import XCTest
@testable import AutomationTestingTutorial

final class AutomationTestingTutorialTests: XCTestCase {
    func testEvenNumberIsTrue() throws {
        XCTAssertTrue(isEven(number: 2))
    }

    func testOddNumberIsFalse() throws {
        XCTAssertFalse(isEven(number: 1))
    }

    func testPerformanceFibonacciRecursive() throws {
        // This is an example of a performance test case.
        self.measure {
            _ = fibonacciRecursive(45)
        }
    }
}
The measure block measures the time taken to execute the code inside it.
Performance Testing App Launch
I have also chosen to focus on performance testing the app launch. There are several benefits of this, but one reason is that if your app takes too long to load it will be off-putting to users. By adding a performance test on app launch you are testing a step users will undertake regularly if they want to use your app, and ensures you are aware of any regression issues and weigh up options to reduce the impact of these on users.
The code for performance testing app launch is as follows:
import XCTest

final class AutomationTestingTutorialUITests: XCTestCase {

    override func setUpWithError() throws {
        continueAfterFailure = false
    }

    func testExample() throws {
        // UI tests must launch the application that they test.
        let app = XCUIApplication()
        app.launch()

        let counterText = app.staticTexts.firstMatch

        XCTAssertEqual(counterText.label, "0")

        let increaseButton = app.buttons["Increase Counter"]
        increaseButton.tap()

        XCTAssertEqual(counterText.label, "1")
    }

    func testLaunchPerformance() throws {
        if #available(macOS 10.15, iOS 13.0, tvOS 13.0, watchOS 7.0, *) {
            // This measures how long it takes to launch your application.
            measure(metrics: [XCTApplicationLaunchMetric()]) {
                XCUIApplication().launch()
            }
        }
    }
}
The measure block specifies that we are measuring the XCTApplicationLaunchMetric and inside the measure block we perform the app launch. If there was any initial setup or configuration this should also be set here.
Prefer a Video Walkthrough?
I walk through the process of adding tests over on my MissCoding YouTube channel. If you’re encountering any difficulties then it could be worth looking at this as sometimes the visual walkthrough can cover things not easily covered by text.
Conclusion
Incorporating XCTest into your iOS app development workflow is a smart move to ensure the quality, performance, and user satisfaction of your app. With XCTest, you have a powerful and versatile tool at your disposal for unit testing, performance testing, and UI testing. By following the guidelines and best practices outlined in this guide, you’ll be well-equipped to build and maintain top-notch iOS apps.
If you’ve enjoyed this article, you may also enjoy my other tech blogs or my MissCoding YouTube channel! You can check out my code over on GitHub and follow me to get an early idea of what videos or articles will be coming next. Additionally, if you have enjoyed my content please support my continued content creation by donating via Stripe.